How To Setup WisePOS Card Readers
Taking payments in-person with the BBPOS WisePOS E in Union is as easy and modern as the software itself. You can swipe cards as you do today, let users enter in their PIN when using a debit card, and use newer payment options like Apple Pay and Google Pay.
To get started, contact us to order the readers you need. The cost for a WisePOS card reader is $257 + shipping. We find that most studios do just fine with one, but if you have multiple entrances or have multiple customers paying at the same time reach out and we'll your orders shipped to you. Once your order is placed, it typically takes 2-3 business days to receive your readers.
Now, let's set them up for use in Union.
Step1: Out of the Box
| First, remove the items from the box and packaging. You should have three things: the reader itself, the battery, and the power cable. |
|
Remove the cover on the back by pulling up the corner. *You may need to use a little extra force to open. |
|
| Install the battery. |
|
After the reader is fully charged, hold down the power button on the right hand side until the screen turns on. *After the device powers on, press the power button to sleep or wake the device. To fully power off the device, hold down the power button until the power off option is shown on the screen, then select it. In a countertop deployment, leaving the device on for extended periods is expected. With a full charge, you can expect the battery to last about eight hours. |
|
Step 2: Connect to WiFi
Once you have turned on your card reader, your reader may check for updates. When that has completed, you will be prompted to select your desired language, to choose your country, and then add your WiFi network.
IMPORTANT: Your reader and the device running your POS application (i.e. laptop) must be on the same network. For example, you may have 2.4 GHz or 5GHz. If your device is on 5GHz, your reader must be on the same network.
Once the WisePOS reader is connected to Wi-Fi, it will automatically go through a series of updates and configurations to ensure it is ready for use. This process includes downloading and applying necessary updates before the device starts.
Step 3: Connect to your Union Account
Once connected, you should see Stripes default home screen.
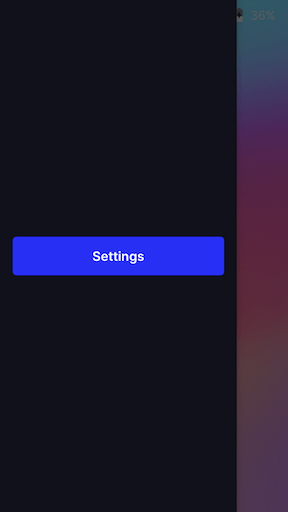
| To open the settings menu, swipe right from the left edge of the reader screen to reveal a Settings button. |
|
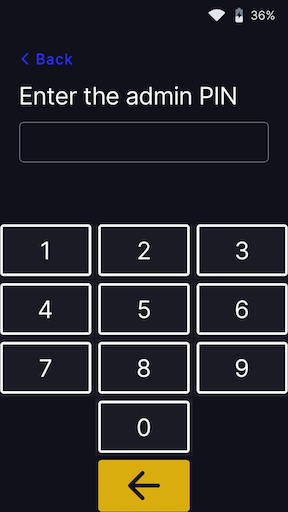
Tap the Settings button and enter the admin PIN 07139 . |
|
Tap Generate pairing code *Future reference: if needed, here's where you can access your WiFi settings |
|
| Once you receive the pairing code (typically string of three words), login to Union. Visit Products > Location and click Edit against the location where your terminal will be located. |
|
| Go towards the bottom of the page and click on Add Card Reader |
|
Give your Reader a name that makes sense to you, like 'Front Desk' or 'Studio B'. Type the code displayed on your Stripe Reader and add this to the box under Registration Code. Once added, click Create. *Be sure to Update Location in the register after adding your new Reader. |
|
Now, go to the Register and update the register's location. You will want to update to your new reader.

You should see the reader icon flash from grey to green. As long as your Reader and POS device is on the same WiFi network, the reader icon will stay a solid green.
Step 4: Testing your Reader
If you'd like to test your reader, you can add your account in the member box. Then, cart a pass that is greater than $0. When the register icon stays green, click Checkout.

When you click Checkout, your Union Register screen will have a grey filter where you can choose to Cancel Card Swipe and let you know that payment is Waiting for customer...

Here's where your Stripe reader will display the customers total and your customer can complete their transaction (swipe/tap/insert chip).

If you'd like you can read more in-depth troubleshooting docs, or if you have any questions please contact Union Support.


